Some angled steel brackets and a few screws, for strength, or epoxy glue, for looks
Home Improvement
Some angled steel brackets and a few screws, for strength, or epoxy glue, for looks
I agree with this approach.
Liberal application of wood glue to all mating surfaces. Then clamp in place and let cure.
The cured wood glue will be stronger than the particle board the drawer is made from.
It'll be ugly as all getout from the inside, but this is probably the only thing you can do aside from replacing the drawer or replacing the backer board.
That said, you should probably fix the primary reason this broke. That much force means:
Or kids who have trouble remembering that kitchen cabinets and drawers are actually not indoor climbing walls
True. Hard to fix that one though.
I’d probably also add some Brad nails or staples so that it’s not just glue.
Second the wood glue. It’s stronger than wood
I don't know if growing out your big toe is possible at this age. Have you tried watering it, and planting it firmly in some soil?
A friend of mine got his to grow with an elaborate system of rubber bands.
I couldn't grow proper facial hair (I'm a guy) and read that using Rogaine (the stuff for balding guys) on the face could stimulate hair follicles. It worked; I now have a beard after using the product for only a handful of months (I don't think balding guys get to stop using it). May Toegaine would have a similar result?
Toe gaaiinnz
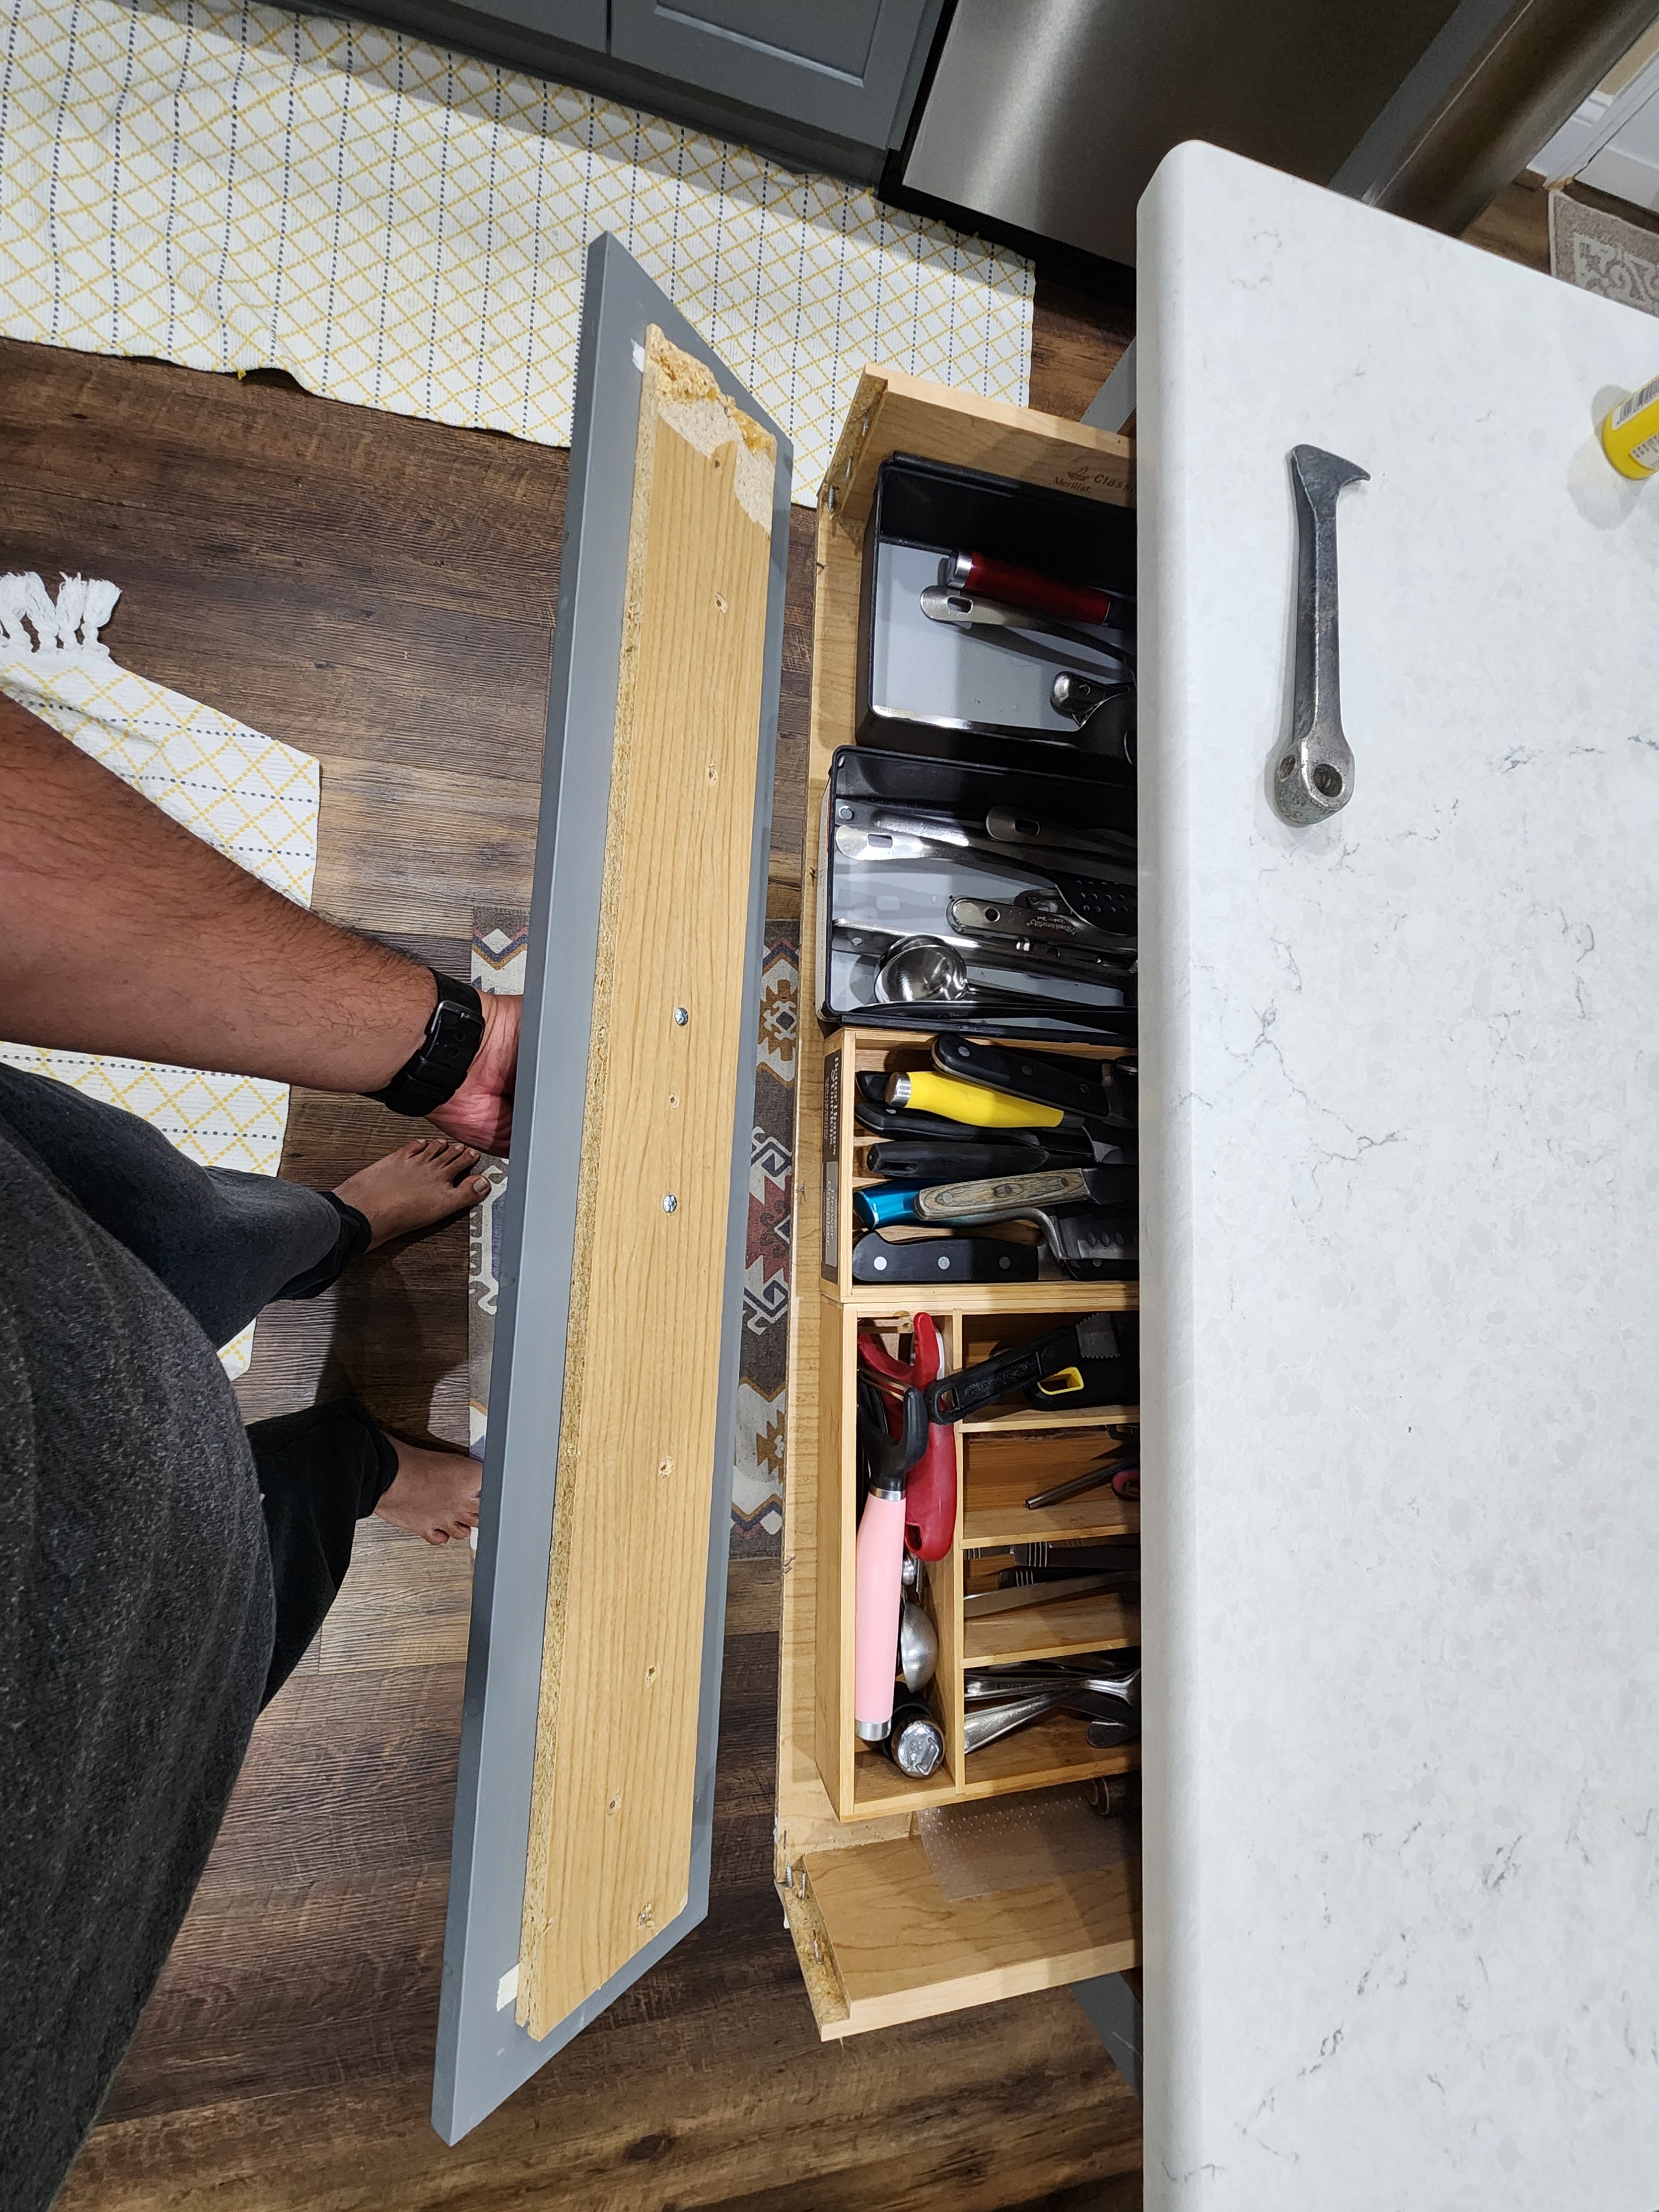
I'm more interested as to why you have a cottered crank from a bicycle on your counter. It looks like it has been cusomized into a tool with a little blacksmith work. What's it do?
lol I don't know it's origin, but we use it to crack open coconuts.
This guy fucks!
You've seen too much.
Regardless of what you do to fix the drawer, consider that its the weight of what you've got in the drawer that caused the failure. Consider either reinforcing the underside, and or waxing or lubing whatever the roller or mounting hardware is. The heavy weight causing drag is ultimately why this failed (along with it just being cheap as shit particle board).
When I've had this issue in the past, I've gone ahead and replaced and reinforced the whole thing with 1/4th inch plywood. You can run two dados up the face board and then run the plywood into those, then pin nail and glue.
Well, we had the bright idea of attaching 3m hooks to the inside of the drawer upside down, and hanging grocery bags from the outside to act as trash bags to swipe vegetable peels off the countertop (if that makes any sense). Coincidentally, we've decided not to do that anymore.
I mean thats what did this, without a doubt.
However, at this point, you need to reinforce the guts. Gluing and pinning are not going to be enough.
I suspect that what caused the failure is a lack of soft close. When closing a drawer, if the slide is smooth and doesn't have a stop, then the drawer front gets a huge impulse when it collides with the cabinet body. Since the entire kitchen likely has the same craptastic quality, the first step is to instruct everyone to close the drawers as gently as possible. Then consider retrofitting soft close mechanisms to the drawers. And maybe even start saving up to replace the cabinets because more failures are likely.
soft close would hurt but when mine failed, it was the weight of the crap warping the structure of the drawer that stressed the joins ultimately leading to failure. Effectively bowing it out from the inside.
Pull the drawer completely out so it is free from the cabinet and empty it. Cut/pull the exposed staples. Clean it up. Dry fit it so it goes back together well and seats as flush as it used to. Titebond wood glue all connecting surfaces, both sides. Fit the drawer front back on the drawer body and set it either front face down on a table with a book or three on the top, or drawer back side down with books/weight on the top/drawer face. Let glue cure for 24 hours. That should honestly be enough unless it gets a lot of abuse. If that's the case, some wood corner/shoe moulding glued into the inside left and right corners afterward should keep it intact. Wood glue is strong AF. Stronger than the wood that drawer is made from.
That's very helpful, thank you
It’s hopeless, just burn your house down
With no offense intended (because the fault is on the cabinet maker), that's one of the flimsiest looking designs I've seen. In most cases, the face is just a plate attached to the cabinet itself.
As for fixing it, it looks like it was just stapled through the sides. I'd pull the staples and clean up the bits where the face ripped off. Maybe try filling in those parts of the face plate with some wood fill or bondo. Then you can run some glue along the cabinet and glue the face back on. Maybe run some L-brackets and nails/screws into it, too, if it still feels flimsy.
Thank you for the advice. The cabinets are supposedly only 3 years old (came with the house). The particle board on the front side seems too damaged. Would a regular piece of wood work?
Looking at the picture, a regular piece of wood should work as long as the thickness is the same. Otherwise the front will sit a bit proud if thicker, or there will be a gap if thinner. Though you could trim the dado back on the sides if it's thicker. Edit: and make sure to measure size before trying to take it off. Just in case it breaks more.
It looks like that particle board is nailed to the face. Hopefully it isn't glued as well, otherwise it'll be a beast to get off. Those screws are just for the handle and likely have no structural qualities.
Looks like there was glue on there before so you can try sanding and re glueing it or glue it and nail or screw it back in
I had the same thing happen the chipboard just gave way because it could not hold up to the weight of the flatware and eventually just crumbled and pulled off. I fixed it by re making the the sides back and front out of a piece of trex decking I has left over and just cut it to the same size with the same rabbits, etc then assembled it with brad nails and gorilla glue. I reused the bottom as it was still in good shape.
Also, what is that on your counter, ice breaker? Motorcycle peg?
Thanks for the advice. It's a coconut cracker.
You'd be better off replacing that particle board piece stuck to the face with a real piece of wood, and securing that to the drawer with long screws, then screwing the gray face plate to the new drawer front.
I agree, that piece on the back of the face got pretty mangled, and glueing it up honestly wouldn't be enough long term.
This is my recommendation also. Honestly a cedar fence picket cut to size wouldn’t be difficult and would only cost $5 assuming you have a circular saw.
It's not that bad, glue and screw. Remove the inner board from the drawer front and reattach it to the drawer first. You might have to clean up the MDF a bit. Use filler if you have to, maybe, but don't use nails. Then reattach the drawer front - again with screws. It might not look perfect, but it'll probably look fine when the drawer is closed. Consider wood block fillets at the interior corners (sacrificing a bit of space).
Alternatively you could rebuild the drawer frame, using the same drawer front so it matches.
My first instinct is to remove the existing screws and staples and add two L brackets to each side.
What's the best way to remove the staples? And do you mean adding two l brackets to the front side of the drawer facing into the drawer?
Wrestle the staples out with needle nose pliers. If that doesn't work, cutting them flush using snips would be plan B. Really you just need to get them out of the way so you can put the front of the drawer back where it needs to be.
Yes, I would think to put the brackets on the inside front and secure them with fairly short screws. One bracket on each side would probably be enough, but I don't see the harm in using two on each side.
Ah, inside front. That makes more sense than what I understood lol.
Another thought. Try the warranty.
https://www.merillat.com/customer-support/warranty-info.html
Edit: Hmm. Says not transferrable. But I suppose it doesn't hurt to try
Gorilla glue maybe?
Take off the drawer handle (the two screws), this will release the wood drawer front from the drawer face plate.
Once you have this wood you can fix it back to your drawer with a L- bracket. If the wood is broken too much on the side, you can replace this part with a piece equal in size and depth.
Like others suggested, pull the nails out and then add your new drawer front, nail it back in (or use screws, pre-drilling your screw holes). Then put your face plate back on.
So those nails seem to be staples. How do I pull them out? They don't show up on the outside. I tried hitting them with a hammer gently, but they don't seem to come back out. Do I cut them off using a multi tool?
You could try clipping them off instead of pulling them out. Just use a flush cutter (or as close to flush) and cut them down to the wood. This is what most do when taking our trim, as it can cause more damage to get the nails/staples out.
You can cut them with a multi tool if you have one, no harm in that. You essentially just need them out of the way so you can put new nails.
A flush cutter is a good idea as well.
First: get yourself a real knife block. Tossing all your knives loose into a drawer is ruining the edges, and keeps them duller than dirt. A dull knife is dangerous.
Second: I wouldn't bother trying to fix that. The particle board looks like humidity has done a number on it, and it's falling apart. I would suggest getting a new drawer made out of 1/2" plywood (1/4" bottom) and box joints. It's pretty easy to do if you have a table saw, but if you're asking here, I'm going to assume you don't.
Walks in, assumes you're stupid, adds nothing, leaves.
On the knife bit it's no huge deal, it's not ruining anything, just hone them often. Our knives would get gangbanged all night in the kitchen, they're designed to have the angle of attack adjusted. - ex chef
Those knives do not look like they've been honed since they left the factory.
Every chef I've known took immaculate care of their knives, and they sure as fuck didn't leave them out in the kitchen for everyone else to use.
Also: the value added is in looking at the remaining particle board that's on the drawer face. You can see that it's split on the right side, and pieces have separated on the left. That doesn't have a lot of structural integrity, and gluing it isn't going to solve that long-term. If humidity is causing the glue holding the sawdust together to lose integrity, then there's not a lot that can be done that will actually fix the problem permanently. Sure, glue it back together. Then it breaks again, only in a slightly different place. Rinse, repeat. This is the problem with particle board, and why it doesn't belong in a kitchen or bathroom.