this post was submitted on 01 Dec 2024
27 points (100.0% liked)

3DPrinting

15910 readers
36 users here now

3DPrinting is a place where makers of all skill levels and walks of life can learn about and discuss 3D printing and development of 3D printed parts and devices.

The r/functionalprint community is now located at: or [email protected]

There are CAD communities available at: [email protected] or [email protected]

Rules

If you need an easy way to host pictures, https://catbox.moe may be an option. Be ethical about what you post and donate if you are able or use this a lot. It is just an individual hosting content, not a company. The image embedding syntax for Lemmy is ![](URL)

Moderation policy: Light, mostly invisible

founded 2 years ago
MODERATORS
 

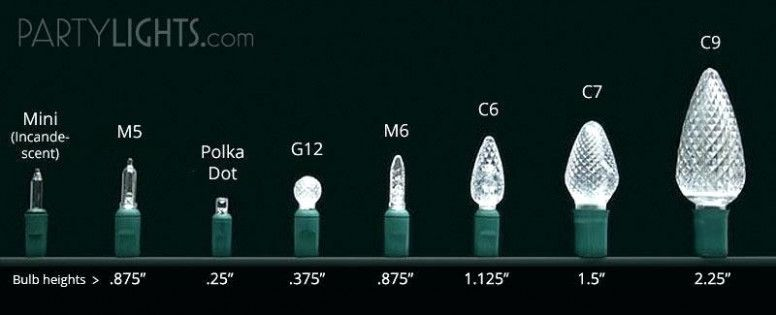
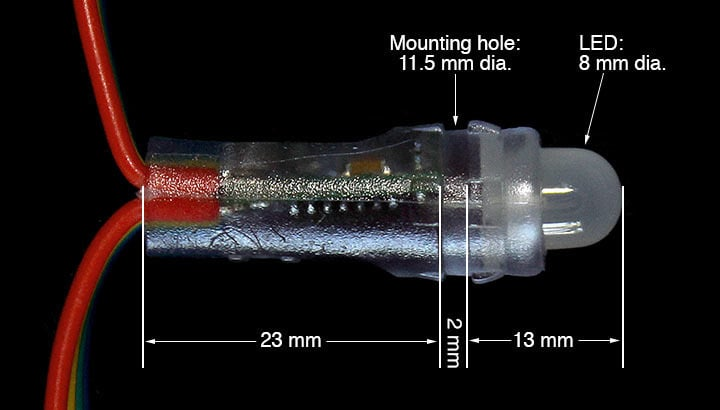
I'm in the process of replacing all my single-color christmas lights with addressable RGB LEDs, but the 12mm "bullet" form factor of them is different from the traditional incandescent mini lights, the 5mm wide angle LEDs, etc.:

You'd think they'd make C6/7/9 bulb covers that attach to them, but I have yet to find any for sale, anywhere. As such, I want to 3D print some, along with 12mm bullet pixel-sized replacements for my snowflake lights:

What's some good filament I can get that will be reasonably clear and stay that way (without yellowing or getting too brittle) for several years' worth of Christmas seasons, despite UV/rain/cold exposure?

(Bonus question: anybody know a good way to model the facets in those "strawberry" lights? The C7 bulbs on Thingiverse, such as this one, are all smooth, LOL.)


Edit: by the way, to be clear (pun intended): I don't need optical clarity like the lens guy; scattering the light is fine. (In fact, doing that on purpose is kind of the point of modeling a faceted C7 bulb instead of a smooth one.) I just want to make sure that whatever part of the filament that doesn't manage to be transparent is white, not tinted some dingy color.

I do happen to have some Inland "natural" PLA laying around and did a test print in that. It's not too bad -- only a little bit yellow at the wall thickness I'm using -- but I fear for how it will hold up over time.

all 33 comments
sorted by: hot top controversial new old
[–] [email protected] 12 points 1 month ago* (last edited 1 month ago) (1 children)

I would just run clear PETG to see how it does, and keep the model files on hand in case they need to be replaced. PETG/s UV resistance is decent and will certainly last at least a continuous year or two in most exposure situations, and it is by far the most cost effective and easiest to print; it's cost effective enough that even if they begin to fail after 2 years, you can print more. and at <$20/kg, it's the cheapest to experiment with.

Polycarb will be more UV,thermal, and impact resistant but not sure it's worth the added cost and printing difficulty for this kind of project. The one major benefit it would have is higher light transmittal vs clear PETG, but it's really not by much, and probably not worth the $15+/kg premium over PETG.
[–] [email protected] 2 points 1 month ago (2 children)

Any opinion on specifically which clear PETG I should get?

[–] [email protected] 2 points 1 month ago* (last edited 1 month ago) (2 children)

Never had Overture steer me wrong. I use Overture almost exclusively for ASA and they're reliable, don't see any reason why they wouldn't work for PETG too.
Their cardboard spools aren't Bambu AMS compatible (or compatible with any filament solution that relies on spool edge rollers), so keep that in mind.

Inland is Microcenter's in home brand and I've heard good things about them too.

[–] [email protected] 1 points 1 month ago (1 children)

Is there any reason to think Creality would be a particularly good choice because it matches the brand of my printer? (If not, I'll get the Overture.)

[–] [email protected] 1 points 1 month ago

Not really any correlation. Plastic filament is plastic filament. About the only outlier would be Bambu with their rfid AMS identification system. But even then, I've put 5 different brands through my Bambu printer and honestly, Bambu filament has performed the worst lol (it's more wet than most out of the box and needs drying).

[–] [email protected] 1 points 1 month ago (1 children)

or compatible with any filament solution that relies on spool edge rollers

?

I've run Overture cardboard spools in my Sunlu filament dryer directly into my printer many times with no incident. It has rollers for the spool edges, no center axle. And other brands' cardboard spools as well.

[–] [email protected] 1 points 1 month ago

Ah. Well bambu ams has issues with their rollers slipping on cardboard spools unless you print a clip on ring that covers the outer edges, only because bambu uses the rollers to backdrive the spool when unloading. Not so for basic feeders

[–] [email protected] 1 points 1 month ago

Overture. IDK where Creality gets their filament but I guarantee they don't make it themselves and printers are their business, not filament.

[–] [email protected] 7 points 1 month ago (1 children)

This sounds like something Alec of Technology Connection would ask.

Hmmm…

[–] [email protected] 4 points 1 month ago (1 children)

I'm flattered, but that guy is into faithfully mimicking incandescent Christmas lights, not programming them to flash different colors to music.

[–] [email protected] 2 points 1 month ago
[–] [email protected] 5 points 1 month ago (2 children)

Hmmm, I would usually go for ASA for anything outside, but searching around for transparent ASA comes up empty... I guess maybe transparent ASA isn't a thing? Too bad, since you could smooth it with acetone to make it even lower opacity. You could also look at Polycarbonate and PETG, which I know can be made transparent, but those might yellow a bit after a few years.

I'm interested in other people's thoughts. Definitely a good question!

[–] Imgonnatrythis 4 points 1 month ago (1 children)

Agree, Asa ideal, but I've never seen it in transparent varieties. I'd actually try PVB - probably some of the nicest transparency. Might not hold up well outdoors, but I'd give it a shot and then go to PETG if it falls apart.

[–] [email protected] 3 points 1 month ago* (last edited 1 month ago) (2 children)

PVB filament is giving me sticker shock ($36 for 750g), as is polycarbonate ($30 for 1kg).

I think PETG is probably the way to go. Anybody have strong opinions between

?

[–] [email protected] 3 points 1 month ago

I've tried Overture, Creality, and Inland (all black though, not transparent) and Overture printed the best for me (at least for functional parts where I cared about print quality and tolerances). Inland's PETG+ and High Speed PETG was even better though.

[–] [email protected] 1 points 1 month ago

Inland is my go-to since Microcenter contracts with good manufacturers. Their ASA is made by Polymaker, the PLA+ is eSun (I use a lot of it), but I’m not sure who makes their PETG. I’m sure it’s good though.

[–] [email protected] 3 points 1 month ago (1 children)

Oh, another thought - you could use a UV blocking clear coat such as this on your print. I still would avoid PLA though, since it might get hot in the sun. It would be important to get a complete coat with that spray, even between layer lines. You might want to think about using a clear resin if you have access to a resin printer, since it would have a much smoother finish before being coated.

[–] [email protected] 2 points 1 month ago (1 children)

Yeah, I'll probably do a clear coat.

The thought of using a resin printer had crossed my mind, as well. It wouldn't work for the snowflakes -- those would be too large for any but the most gigantic resin printers -- but it would be optimal for the C7 bulbs. That said, I literally just bought a new filament printer (just an Ender 3, not a fancy Bambu or anything -- until now I was making do with a MP Mini!) and buying two printers at the same time makes my bank account sad.

Also, I'm not sure the material resin printers use is all that great at resisting UV either.

[–] [email protected] 3 points 1 month ago

Oh 3d printer resin is absolutely not UV resistant - resin printers use UV light to solidify the resin at each layer, and exposing a print to too much UV light after printing can cause UV burn, similar to a thermoplastic.

Coating the print in a UV resist clear coat should prevent UV light from reaching the print itself, and preventing the burn; think of it as sunscreen for your print 😉

[–] [email protected] 4 points 1 month ago (1 children)

PETG is probably the way to go.

Honestly PLA would probably work just fine for this application as well. It's not like the things are going to be enduring any mechanical load or high temperatures.

[–] [email protected] 3 points 1 month ago (2 children)

It's really the UV I'm worried about. Even my commercially-made snowflake lights are pretty yellowed and brittle now, and I think they're still less than a decade old (so less than 10 months of actual use).

[–] [email protected] 4 points 1 month ago (1 children)

That should tell you exactly why worrying about UV is a mug's game. This is going to be an issue with all polymers, even tough old polycarbonate.

You could probably improve matters by clearcoating your objects after printing. The stuff used on car headlights after polishing is specifically for this purpose, and I believe Krylon makes an "arts and crafts" oriented clear coat that's also billed specifically as UV protective and is probably cheaper.

[–] [email protected] 1 points 1 month ago (1 children)

That is a very good point!

[–] [email protected] 2 points 1 month ago

Well, the difference here is that if they yellow out in 3 years, you can simply print replacements for a few bucks instead of junking the string.

[–] [email protected] 3 points 1 month ago (1 children)

Whole lotta talk about filaments but none about modeling -- in blender, create an ico sphere, then add a subdivision modifier. Then, add a decimate modifier, set that modifier to planar, and slide the angle limiter till you're left with only hexagons (and a few pentagons). Apply the modifiers, then in edit mode, select all, then scale non z factors (hotkey s then hit shift z) to get it to lightbulb shape. You can add a solidify modifier to take it from a solid to a hollow sphere, then from there you you can do a boolean cut in edit mode or with a modifier to take off one of the ends. Personally I'd take it into fusion 360 from there to add your attachment method and/or base piece. Let me know if you have questions or want help!

[–] [email protected] 1 points 1 month ago (3 children)

I just want to thank you for your comment even if it didn't quite answer my question (which is, I assume, why you deleted it). I'm very much a CAD guy, not an artistic 3D modeling guy, so the Blender approach is a total mystery to me and I appreciate you causing me to think about it.

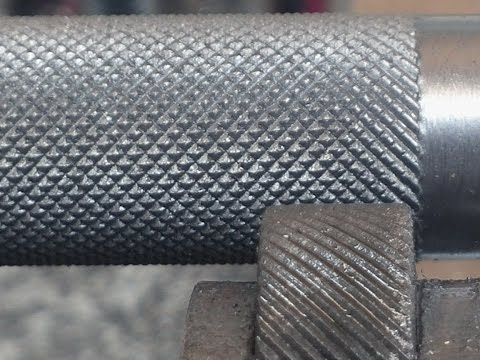
My approach would be something more like creating the profile of the bulb using a bezier curve (b-spline) revolving it to make it a solid, figuring out some way to apply the facets (that's the part I need help with), and then offsetting it to make it a hollow thin wall shell.

It's those facets that have me stumped: I think I've figured out that probably the way they do it in the real world is to carve spiral cross-hatched V-grooves into the mold they cast the things from (basically like knurling), so the result is the negative impression with raised edges and sunken centers instead of pointy pyramids. But how the Hell do I do that to a bezier-curved surface in a parametric CSG modeller like OpenSCAD or FreeCAD?!

(I wonder if posting this reply to a deleted comment will work?)

[–] [email protected] 4 points 1 month ago* (last edited 1 month ago)

Yeah I didn't realize you were after a specific style of faceting until I posted the comment and scrolled back up. I'm sure there's an easy way to do it in blender, I'm just not quite sure how... I'll let you know if I figure it out! The method would be subdividing each face of the icosphere in three, with a point at the center of each triangle and cutting lines from the existing corners to it, I'm just not sure how to do it automatically. Once you have it divided like that, easy enough to grab those new center points and scale them out to make your triangle facets

Here's the result the deleted comment yields

With a basic bevel

[–] [email protected] 3 points 1 month ago* (last edited 1 month ago)

Took a quick crack at doing it by hand, subdiving an icosphere in that specific way and copying it around.

Definitely a bit time consuming but not too bad for that many faces. I imagine scaling it up would make finding an automated solution more important though. That was maybe 10 minutes of work? not bad

scaling it and solidifying yields this

Step by step:

Basic icosphere

Subdivided the edges and connected to opposing corners to find the middle of the triangle

Cut the last edge in and dissolved unnecessary edges

Repeated for each level, then duplicated and rotated 5 times to make the sphere out of these divided faces (mirrored on the z axis to save half the work)

Selecting all those midpoints with a side on xray view

From there just scaling them out to make the pyramids

[–] [email protected] 1 points 1 month ago

If you want to do that in OpenSCAD, I'd look into how a pineapple gets cut, and then try to emulate that. I've dabbled with openscad but never got super far in it, so not sure what's possible with revolves and splines and the like

[–] [email protected] 3 points 1 month ago

I printed some PETG clips for my outside railing to attach chicken wire (part of a catio). They've been fully exposed to the elements and sun for 2 years now, and aren't brittle yet.

[–] [email protected] 3 points 1 month ago* (last edited 1 month ago) (1 children)

Honestly? This seems like a really bad use case for FDM (less familiar with resin). Clear filament is very deceptive and actually getting reasonably translucent prints out of them can be a hassle. CNC Kitchen did a video on this a few years back. Far from perfect but https://www.youtube.com/watch?v=9qb25Gi4Jv0. Of particular note is the cooling and support related hassle which is of particular interest if you are printing light bulbs.

I get you don't care if it is clear. But clear filament gets REAL cloudy REAL fast and that is a factor with lighting.

Also? You already keyed in that UV and exposure are hell. Also understand that even LED bulbs can get pretty hot. Not hot enough to melt the plastic (probably) but likely enough to cause further clouding and so forth.

People very much underestimate just what a torture test xmas lighting is and why so many are designed to be more or less consumable objects. You can stretch that out if you properly maintain them in the off months but you are still expecting them to run for 8-12 hours a night for a month (or more) straight during some REALLY harsh weather.


I would also make sure the prints are actually water tight. Because properly wired lights are fine if a diode shorts out. How much do you trust your wiring for something that lives on the exterior of your home in the rain and snow? Hell, I barely even trust commercial xmas lights for that purpose.

[–] [email protected] 2 points 1 month ago* (last edited 1 month ago)

Honestly? This seems like a really bad use case for FDM (less familiar with resin).

I mean, you're probably not wrong, but what's the alternative? It's not as if I'm going to injection-mold them or machine them out of a solid block of plastic.

...

[sigh] Damn it, now you've got me researching DIY injection molding and rotomolding (once I finish writing this). Thanks a lot! 😠

Clear filament is very deceptive and actually getting reasonably translucent prints out of them can be a hassle. CNC Kitchen did a video on this a few years back. Far from perfect but https://www.youtube.com/watch?v=9qb25Gi4Jv0. Of particular note is the cooling and support related hassle which is of particular interest if you are printing light bulbs.

Thanks for that video link; it was informative.

Regarding transparency/translucency: before even posting this thread, I had already done a quick-and-dirty test print of a C7 bulb cover with some Inland "natural" PLA I had lying around and "normal" settings -- not even really dialed in for my new printer at all, let alone customized for maximum transparency -- and it was fine (except for being slightly yellow). It's only a 2 perimeter thick shell, after all.

Heck, I might drop that down to one and use spiral vase mode, if I can figure out how to print the lugs that lock into the groove on the pixel in that mode, instead of a solid bottom layer.

People very much underestimate just what a torture test xmas lighting is and why so many are designed to be more or less consumable objects... I would also make sure the prints are actually water tight. Because properly wired lights are fine if a diode shorts out. How much do you trust your wiring for something that lives on the exterior of your home in the rain and snow? Hell, I barely even trust commercial xmas lights for that purpose.

Regarding lighting durability/water-tightness: the way these bullet pixels work is that the hole in the casing where the wires come in is completely filled with potting compound (at least 1/4" from the outside to anything conductive). Also, I'm doing all my wire splicing with marine grade solder seal heat shrink connectors. I'm pretty sure I could run the lights submerged and they'd be fine.

The things I'm printing are just decorative covers to diffuse the light into more interesting shapes. They have nothing to do with protecting the strand itself, and the worst that could happen if water gets in them is that they might get moldy or something.