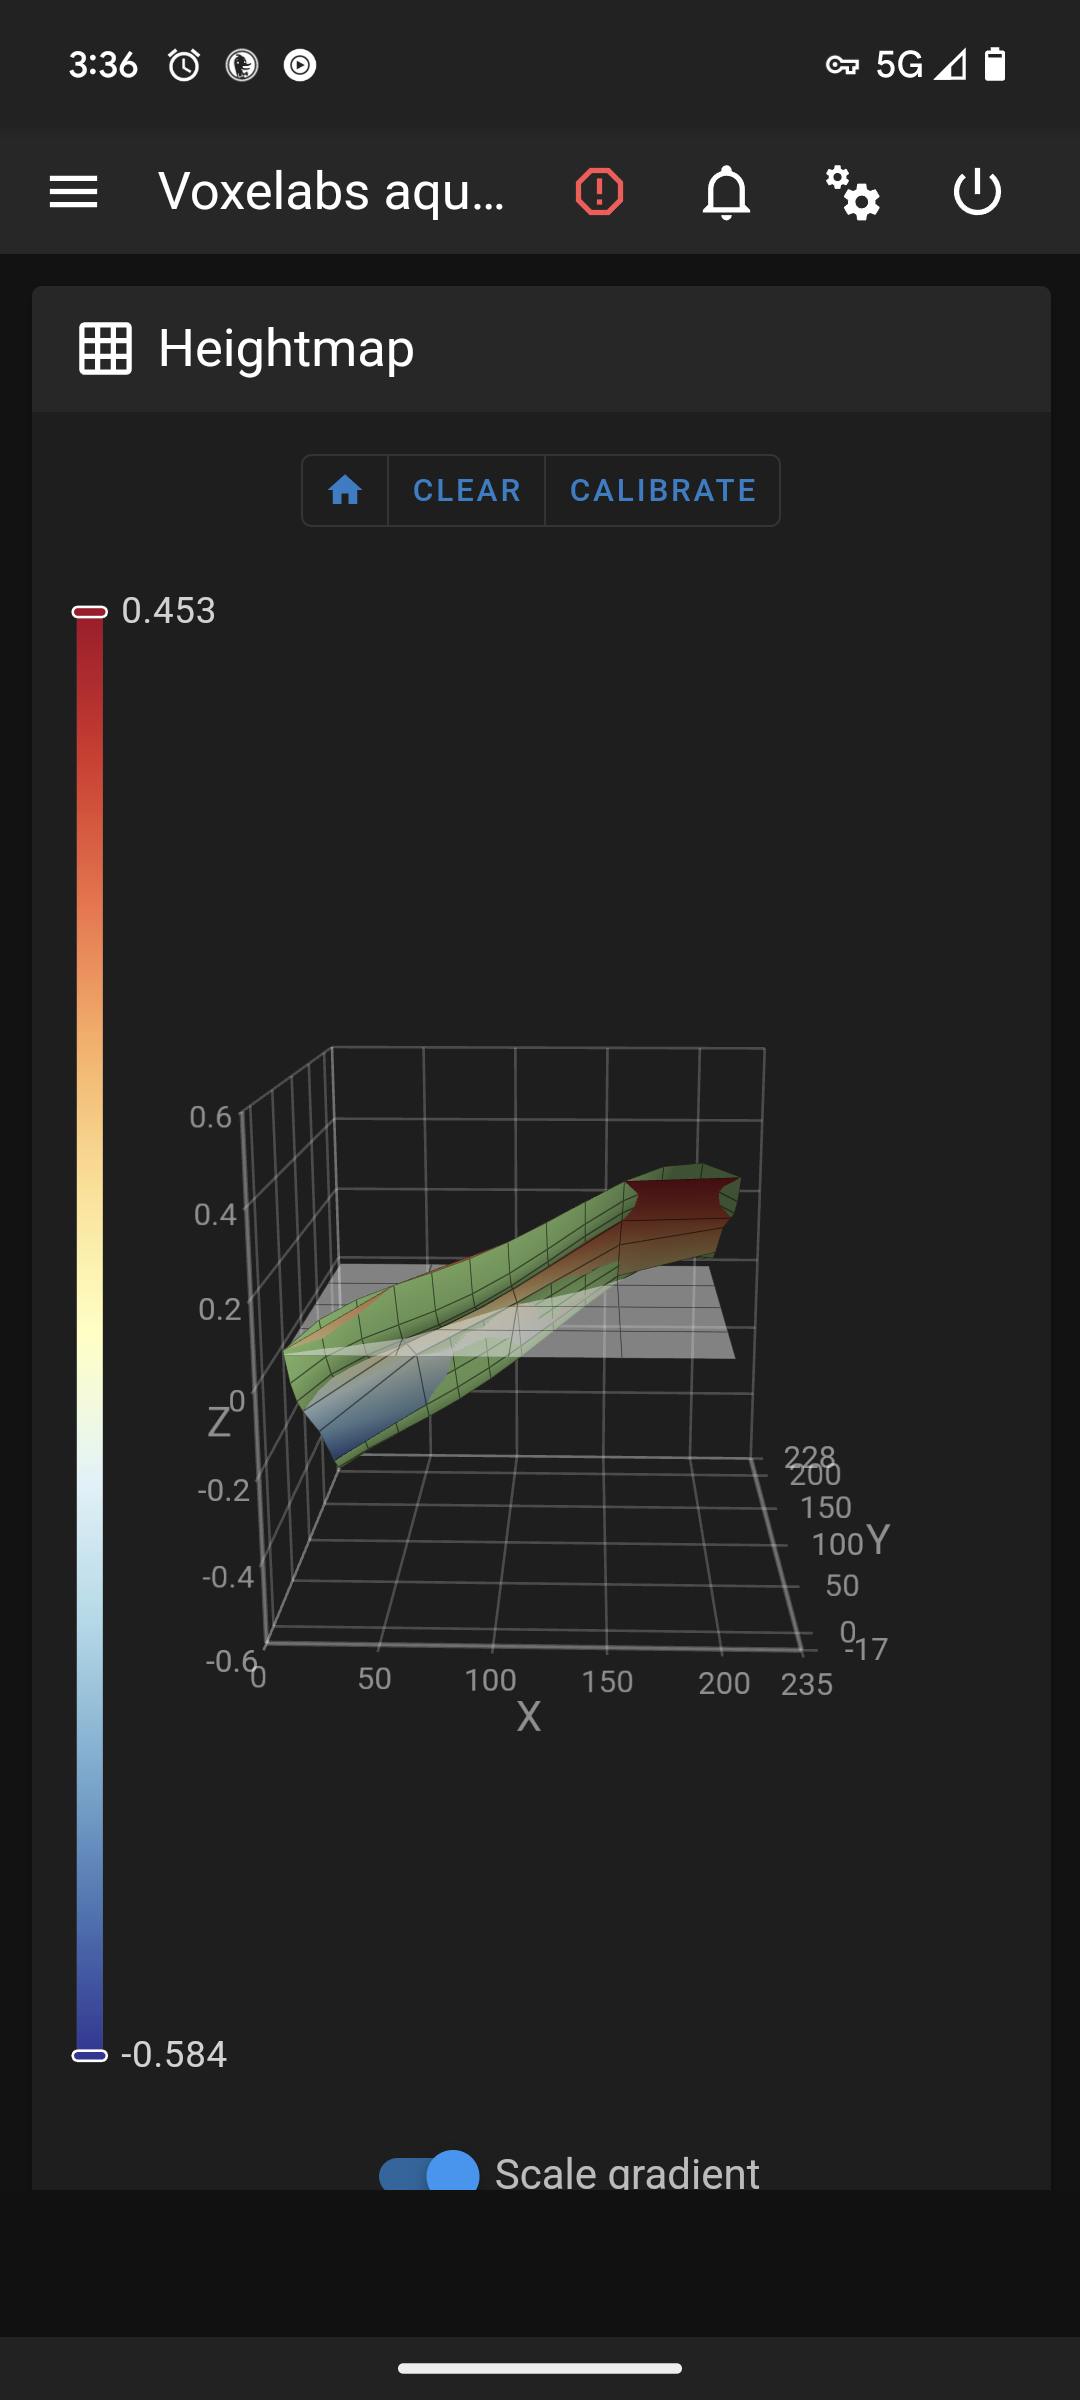
I am finally reaching out as I am at my wits end and need experienced people to help me resolve my printing issue.
I have a Voxelabs Aquila (Ender 3 v2) formerly running marlin with small but manageable annoyances like overhang and manual bed leveling and thus began my journey after a year of using Aquila to start modding/upgrading the thing.
First thing i did was upgrade the fans and shroud, this improved prints slightly but was still not satisfied.
Moved to Klipper and added BLTouch and this is where all my problems started. After hours of following guides and troubleshooting of setting them both up, i still get very little bed adhesion and layers are not smooth together (gaps) with the same 3d slicing software i have been using before the switch (yes changed it to Klipper firmware in slicer)
As you can see in the picture this is after a manual bed level. Where do i go from here?
Edit 2: fully cleaned nozzle, hotend, and bed without any other changes with same results.
Edit 1: forgot to add my printer.cfg
[include mainsail.cfg]

[stepper_x]
step_pin: PC2
dir_pin: PB9
enable_pin: !PC3
microsteps: 16
rotation_distance: 40
endstop_pin: ^PA5
position_endstop: 3
position_max: 235
homing_speed: 50

[stepper_y]
step_pin: PB8
dir_pin: PB7
enable_pin: !PC3
microsteps: 16
rotation_distance: 40
endstop_pin: ^PA6
position_endstop: -17
position_max: 228
position_min: -17
homing_speed: 50

[stepper_z]
step_pin: PB6
dir_pin: !PB5
enable_pin: !PC3
microsteps: 16
rotation_distance: 8
endstop_pin: probe:z_virtual_endstop
#position_endstop: 0.0
position_max: 250
position_min: -6

[extruder]
max_extrude_only_distance: 100.0
step_pin: PB4
dir_pin: PB3
enable_pin: !PC3
microsteps: 16
rotation_distance: 34.406
nozzle_diameter: 0.400
filament_diameter: 1.750
heater_pin: PA1
sensor_type: EPCOS 100K B57560G104F
sensor_pin: PC5
#control: pid
# tuned for stock hardware with 200 degree Celsius target
#pid_Kp: 21.527
#pid_Ki: 1.063
#pid_Kd: 108.982
min_temp: 0
max_temp: 250

[bltouch]
# Can't move this configuration to include because of z-offset adjustment
sensor_pin: ^PB1
control_pin: PB0
x_offset: -28
y_offset: -15
#z_offset = 0
samples: 2
speed: 2
#pin_move_time: 0.500
#probe_with_touch_mode: False
#pin_up_reports_not_triggered: True
#pin_up_touch_mode_reports_triggered: True
#stow_on_each_sample: False

[safe_z_home]
home_xy_position: 125,125 #this should be the center of your bed
speed: 50
z_hop: 10
z_hop_speed: 5

[bed_mesh]
speed: 80
horizontal_move_z: 5
mesh_min: 3, 33       #!!min and max co-ords are based on the probes location not the nozzle!!
mesh_max: 207, 213  #needs to be calibrated for your individual printer
probe_count: 5,5 #this is the number of probing points on X then Y axis
mesh_pps: 2,2
fade_start: 1
fade_end: 10
fade_target: 0

[bed_screws]
screw1: 25, 25
screw2: 195, 25
screw3: 195, 195
screw4: 25, 195

[heater_bed]
heater_pin: PA2
sensor_type: EPCOS 100K B57560G104F
sensor_pin: PC4
#control: pid
# tuned for stock hardware with 50 degree Celsius target
#pid_Kp: 54.027
#pid_Ki: 0.770
#pid_Kd: 948.182
min_temp: 0
max_temp: 130

[fan]
pin: PA0

[mcu]
serial: /dev/serial/by-id/usb-1a86_USB_Serial-if00-port0
restart_method: command

[printer]
kinematics: cartesian
max_velocity: 300
max_accel: 3000
max_z_velocity: 5
max_z_accel: 100

#*# <---------------------- SAVE_CONFIG ---------------------->
#*# DO NOT EDIT THIS BLOCK OR BELOW. The contents are auto-generated.
#*#
#*# [extruder]
#*# control = pid
#*# pid_kp = 31.251
#*# pid_ki = 2.510
#*# pid_kd = 97.268
#*#
#*# [heater_bed]
#*# control = pid
#*# pid_kp = 69.577
#*# pid_ki = 1.022
#*# pid_kd = 1184.541
#*#
#*# [bltouch]
#*# z_offset = 3.609

One thing that was driving me crazy was that even when I manually leveled, I wasn't getting uniform leveling as I expected. Turns out that klipper doesn't automatically load the measured grid automatically. So basically after I ran the bed leveling, it requires a restart to save, but doesn't load on start. Once I realized that, I made a habit of just loading the mesh manually each time it restarted. Started getting expected leveling results after that.
I took too long to learn this too. Even with it leveled via bltouch, i still have adhesive issues.
I suggest looking into macros which will allow you to set your mesh profile in gcode which will resolve any manually selecting of mesh. This is my next step after i fix this major issue I'm having.
Are you calling the mesh something other than "default?" Mine will load the previous mesh automatically. I believe you have to change the config to use your preferred name as the default mesh instead of using "default" in the config.
I've always used the name default. I'll look into changing it in the config.
Not sure what the issue is here then as this is how I'm running mine as well. I didn't have to make any changes to the config.
What version of klipper are you using? I know it used to auto load the default profile, but they changed it about a year ago to require you to manually set it, either with a macro or in gcode itself.
Not sure on the version. It should be updated to the latest or nearly the latest version.
I had the same issue too. Idk what its related to but learned this hard way too. Im moving to macros in gcode after i get the main issue fixed and doing so will let me select the mesh name.
As far as adhesion goes, what print surface are you using? I personally have found that a glass bed with aqua net hairspray works better than any other combo that I've tried. I almost never have any issues with adhesion using PLA or PETG.
Glass bed that came with printer. Only printing PLA.
Are you using anything on the bed?
I am not, never have. Always clean it with Isopropyl 70% or greater after about 5 prints or if it sits unused for a lengthy amount of time
I seldom had any good adhesion on clean glass. But cheap hairspray works wonders for me. Gives it something to stick to, but also functions as a release agent. Especially helpful if you ever use PETG, because it's been known to actually bond to the glass.
I have the opposite, it will stick well to cleaned glass and after following first post suggestions and flipping the glass surface to the smooth unscratched side, it sticks without anything else.