Boelthor

joined 1 year ago
 

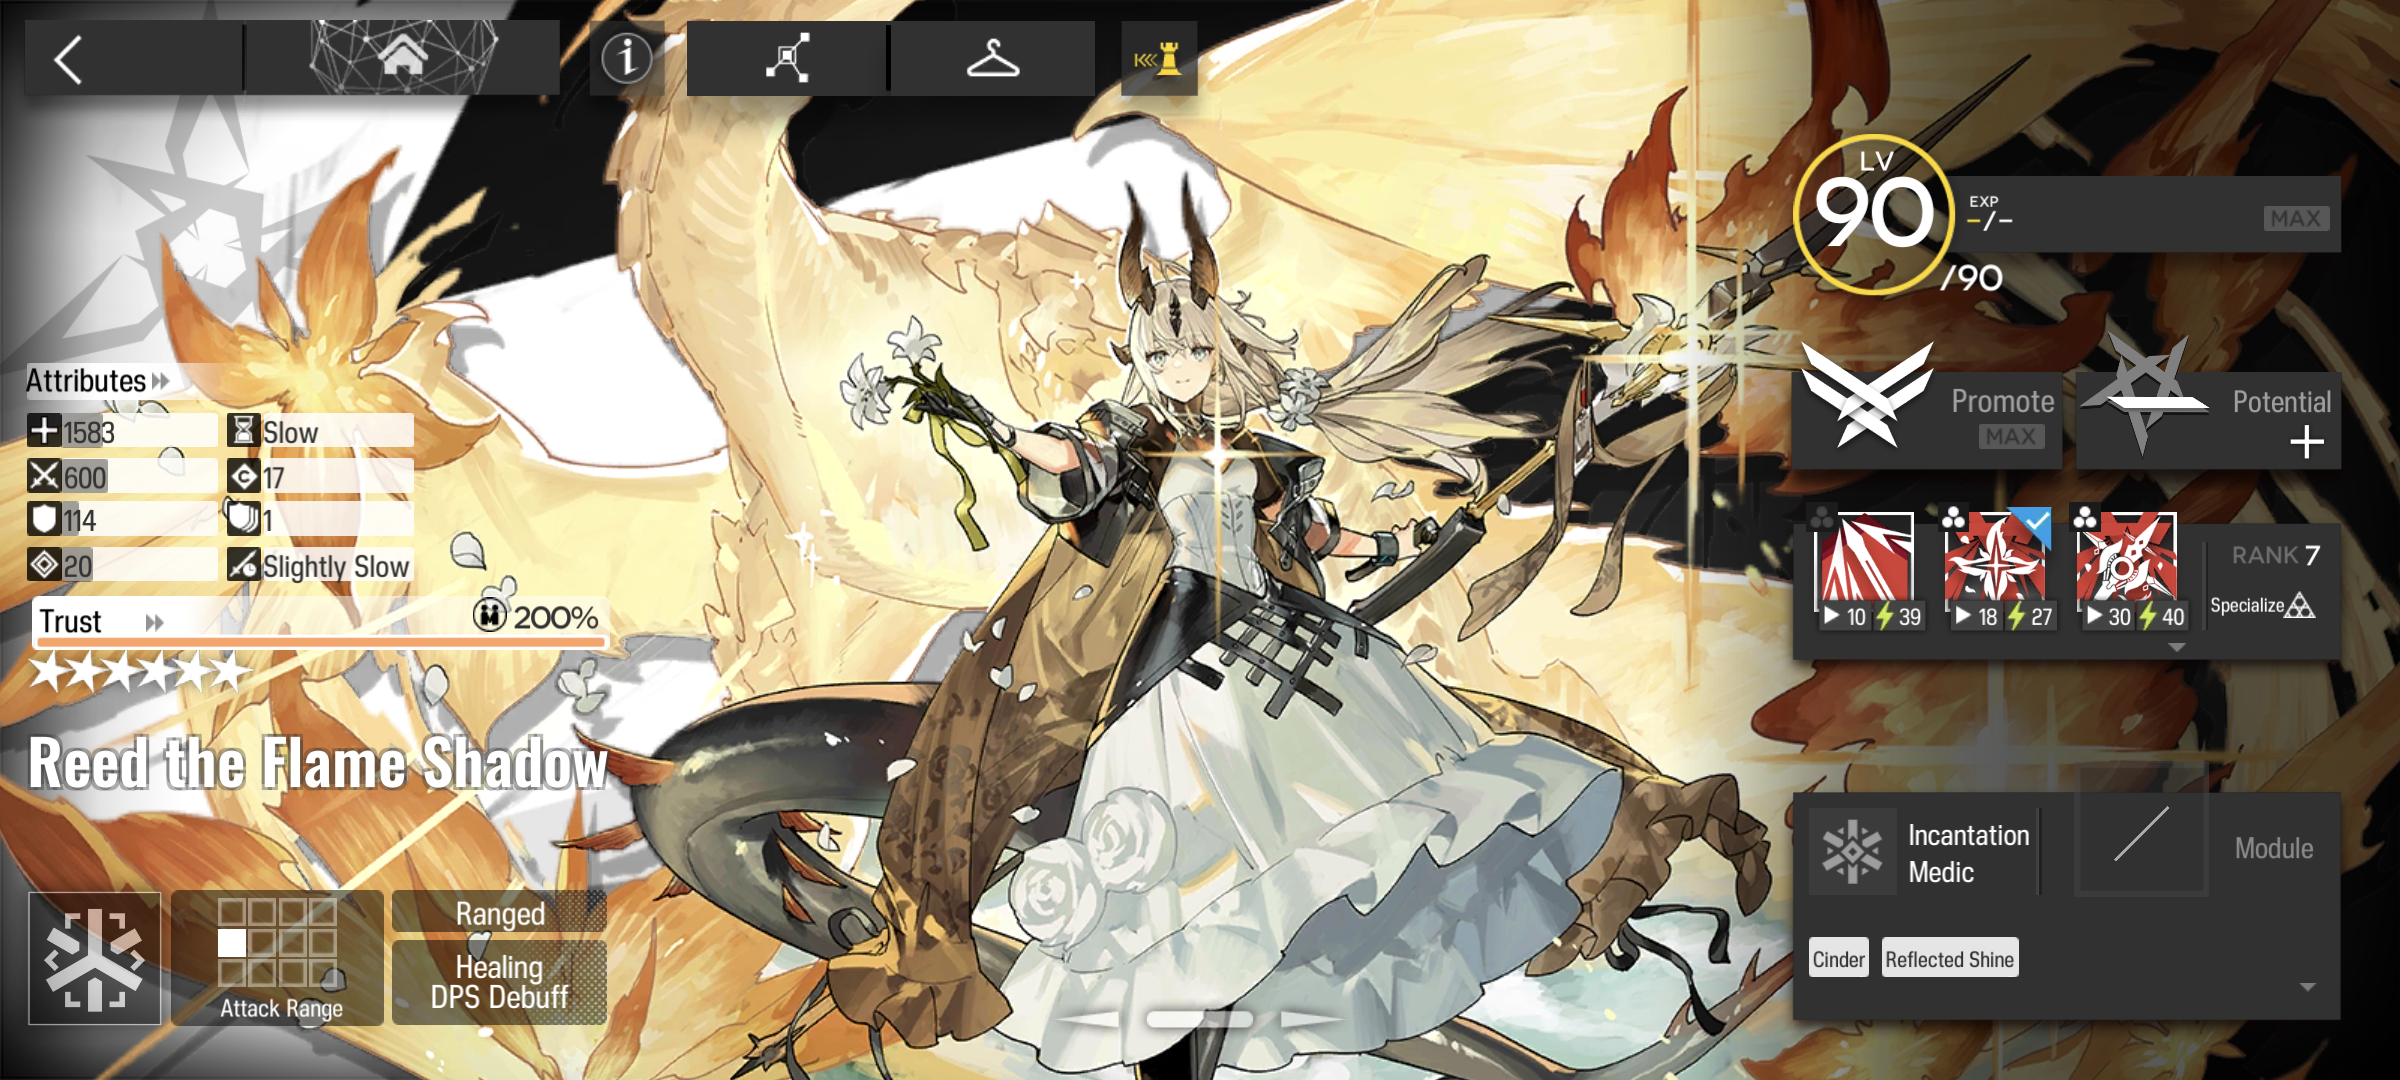
Qiubai is an operator who's been receiving a lot of negativity lately, in no small part due to FOMO on upcoming strong operators, especially the true limited Kirin R Yato. But her kit happens to be right up my alley (and I like her character quite a lot too), so hopefully this guide can help balancing things out by showing her on her own merits.

Basic Information

Qiubai is a 6* Lord Guard, placing her in a branch that's been historically well-regarded, but hasn't gotten a new high rarity member in ~2.5 years. She has a few different things that help her carve out her own spot: she's among the best ground-based Arts units, she has access to crowd control, she has overall stronger attacks off skill, and she has more than one useful skill.

Offensive Stats

Qiubai has average Attack, a 1.3 second attack interval, below-average dps, and standard Lord range. As with all Lords her range is great, but it's up to her talents and skills to make up for her lacking stats.

Defensive Stats

Qiubai has slightly below-average HP, above-average Defense, 10 Res, and 2 block. While she's no tank, her high Defense is nice for dealing with trash mobs.

Cost and Trust

Qiubai has a below-average 20 DP cost, and her trust is split evenly between Attack and Defense. HG seems fixated on the notion that Lords should be at least partially defensive, resulting in some of the 6*s' trust being diverted to Defense. Her DP cost is quite nice, however, being low enough that you can often open maps with her.

Trait: Can perform ranged attacks that have an 80% Attack multiplier

"Ranged Attack" is any basic attack against something Qiubai isn't blocking, and can hit flying enemies. Because the Attack penalty is applied before Defense it worsens her ability to deal with anything that has a meaningful Defense stat.

First talent: Find an Opening

0.1s after attacking an enemy affected by Slow or Bind, deal an additional hit of Arts damage equal to 40% of Attack (unaffected by trait).

"Slow" refers specifically to the debuff called "Slow" rather than any kind of movement speed reduction. Talent 1 can trigger off of any instance of damage with Qiubai as the source, with the exception of talent 1 itself.

This talent provides a nice chunk of extra damage when it applies, especially since it's not reduced by her trait. Something to keep in mind is that in Arknights debuffs are applied before damage by default, so any of Qiubai's attacks that inflict Slow/Bind will trigger this talent. Both s1 and s2 can guarantee Bind/Slow on their own, while s3 and basic attacks rely on talent 2 for Bind. And this is a bigger damage boost than it might appear; Lords in general suffer from low dph on their basic attacks, especially at range, and this being Arts damage lets Qiubai circumvent that.

Second talent: Falling Petals

Attacks have a 20% chance to Bind the target for 1.5s

Talent 2 can trigger off of any instance of damage with Qiubai as the source, with the exception of talent 1.

20% is an aggravatingly low chance, but the payoff is high; not only will the Bind proc talent 1 on the current attack, but the duration is just long enough for the next attack to benefit as well. While you generally can't rely on this Bind for the purposes of cc, it still makes her basic attacks markedly better compared to most Lords in the long run.

Incidentally, Bind immunity is effectively nonexistent; there have been two CC Risks that made certain units Bind immune, and other than that nothing else to the best of my knowledge.

Modules

While Lords do not have modules yet on CN as of the time of writing, I want to call attention to the fact that Qiubai stands to profit greatly from hers. Both of her talents are important to her kit and would benefit from simple numeric improvements, so unless HG decides to staple on new effects instead her upgrades are near certain to be valuable. The base Attack improvement will also be significant, as she has high talent/skill multipliers to make up for the lower base stats from being a Lord.

First skill: Halting Feather

At m3{m0} Halting Feather has 0 initial SP, costs 4{5} SP, recovers SP by attacking, lasts for a single attack, and is automatically activated. It causes the affected attack to ignore Qiubai's trait and inflict Bind for 3{2.5} seconds. When the 3{2.5} seconds are over or the target dies, the target and all enemies within a 1.7 tile radius take Arts damage equal to 300%{240%} of Qiubai's Attack. The Bind ends prior to the AoE damage and thus doesn't guarantee a talent 1 proc on the primary target, but talent 2 can still trigger off of the AoE damage or an external source can apply Bind/Slow to cause talent 1 to proc.

S1 is an odd skill; the first thing that likely stands out is that it provides a 3s bind but costs only 4 SP; accounting for the cast time it can give ~46% Bind uptime on its own, and with external ASPD buffs and/or SP batteries it's possible to permaBind a single target. Outside of that, it's got one of the biggest splash radii in the game, it's running off of Lord range, and it's Arts. In particular, the splash AoE can reach outside of her range, expanding her possible reach even further beyond the vast majority of melee units. While s1's damage isn't exceptional, it's still solid and enough to do its job, especially since there aren't any exact replacements for its unique features.

Second skill: Holding Shadow

At m3{m0} Holding Shadow has 5{4} initial SP, costs 10{12} SP, recovers SP by attacking, lasts 5 seconds, and is manually activated. Upon casting the skill Qiubai's range changes to a 1x4 line straight ahead of her, and she deals Arts damage equal to 300%{240%} of her Attack (unaffected by trait) to all ground enemies in range and Slows them for 1.2s. For as long as the skill lasts all enemies within range are Slowed and Qiubai gains +140%{+90%} Attack (she still attacks normally during the duration, and it lasts long enough for her to perform 4 basic attacks if no ASPD modifiers are applied), and after 4.88 seconds (the +Attack and Slow are still active) she deals physical damage equal to 300%{240%} of her Attack (unaffected by trait) to all ground enemies in range.

S2 is a deceptively good skill; the ingame description leaves the details of various interactions unmentioned, and as a result the skill can look unimpressive if you don't sit down and study the various related mechanics. But in practice almost all of those inner workings are in s2's favor: the starting attack applies Slow and debuffs apply before damage so the starting attack benefits from talent 1 (along with the remainder of the skill), she has just enough time to squeeze in a 4th normal attack even though duration might not seem long enough, and the ending attack occurs before the +Attack and Slow expire (although the associated talent 1 procs occur after the +Attack expires).

In short, s2 deals considerably more damage than you might think; the AoE portion alone will wipe out trash mobs and soften up elites, which the single target portion can finish off. The Slow is quite useful as well; the Slow debuff inflicts -80% move speed so enemies in her range will be nearly frozen in place for the duration of the skill. Offensive recovery may be off-putting, but the Lord chassis does well with it thanks to the extra range giving more attack uptime and the weaker basic attacks letting her farm more SP off of trash mobs, and 10 SP is still rather cheap. The change in range, however, is generally a downgrade; while the 1 extra tile in front lets her reach things that melee units other than Fortresses can't, it comes at the cost of the 4 tiles to her sides that can allow her to cover multiple lanes easily.

Third skill: Questioning Snow

At m3{m0} Questioning Snow has 45{38} initial SP, costs 55{58} SP, recovers SP over time, lasts 30 seconds, and is manually activated. While s3 is active, her range expands, she gains +55%{+40%} Attack, her attacks deal Arts damage, she attacks up to 3 targets at once, {talent 1's Attack scale is multiplied by 2}, ranged attacks are no longer penalized by her trait, and every attack she makes gives her +13 ASPD for the remainder of the skill, up to 8{6} stacks.

That's a long list of effects, but the short version is that s3 does a lot of damage. The ASPD boost goes hand-in-hand with her second talent, giving it more chances to proc, and also lets her proc talent 1 more times within the 1.5s bind duration. S3 also offers good cc once she's ramped up (which happens quickly). As a rule of thumb, once she's ramped up talent 2 will proc often enough that talent 1 will proc for ~50% of her attacks*, and an external source of 100% Bind/Slow uptime is worth ~29% more dps (plus it eliminates RNG from the equation, and any incidental Bind/Slow during downtime still buffs her basic attacks). The skill is also hindered by its rotation, which is a little long by modern AK's standards, though not prohibitively so. I do want to emphasize, however, that even standalone s3 has more than enough damage for just about anything short of bosses (or extremely high Res elites, but then why are you using an Arts skill?); external Bind/Slow are more of a luxury pick for when you'd be bringing an enabler anyway, letting you double dip on cc and dps increases rather than picking one or the other. Also, don't forget that s3 is multitarget; it will incidentally wipe out mobs without getting distracted from bigger targets.

  • The math behind this number: during s3 her ASPD is fast enough that a talent 2 proc lasts long enough for her to make 3 attacks. This means that, for any given attack, if talent 2 procs on that attack, the previous attack, or the one before the previous attack, talent 1 will proc on the current attack. The probability of an event with a 20% success rate occurring at least once out of 3 trials is 1-(1-0.2)^3=0.488, which is roughly 50%.

Mastery Choices

S3 is Qiubai's "meta" skill from her appearances in stuff like high risk CC, but that doesn't mean you should necessarily focus on it. AK is oversaturated with this sort of Big Damage skill, from the venerable SA and Eyja1 to the newfangled Mlynar, so if you have some of those skills already Qiubai's own s3 may not have as much to offer. One of the big things that sets it apart is that it's much more receptive to buffs than most of its competitors--other Big Damage skills typically have large +% Attack which dilutes external Attack buffs, but Qiubai s3 focuses more on ascale and ASPD which multiply external Attack buffs, on top of her getting dps boosts from external Slow/Bind. Qiubai can reach astronomical total damage numbers in situations where you're stacking enablers...the problem being that that level of firepower is rarely warranted.

But even so, s3 is still a good skill in a vacuum (without external Slow/Bind), and it also has extremely valuable masteries due to gaining the new talent 1 multiplier from them. And the Bind, while not perfectly consistent, offers something that other Big Damage skills don't have that is more widely relevant: crowd control, which can keep elites and bosses safely away from your squishier units. If you don't already have a glut of Big Damage skills to choose from, want to take advantage of s3's characteristics, and/or just want to use Qiubai for your Big Damage needs then don't hesitate to master and use it.

S2, on the other hand, is where I suggest most people start. While the Big Damage niche is hotly contested, Qiubai s2 is so far ahead of other fast rotation AoE damage skills that its competitors might as well not exist. The only ones that are remotely close are Fiammetta s2 (if sweetspotted, and Fia is a ranged unit) and Ch'en1 s2 (which is outdamaged by the AoE portion of Qiubai s2 alone even with max mod, and has a higher SP cost).

As for s1, it's hard for me to give it a fair evaluation; its something I wouldn't recommend most players master due to the cost and s2/s3 being overall more valuable, but if you plan to m9 Qiubai anyway you'll find it surprisingly useful. An advantage I didn't mention above is that unlike s2 it doesn't change her range, allowing her to cover multiple lanes more easily.

Usage

I feel like Qiubai is a very straightforward unit, so there's little to say here; the confusion with her skills is more numerical than functional. The biggest tip I can give is that when using s2 you should place her according to s2's range rather than her base range; she'll only be able to hit those side tiles with her weaker basic attacks, so their value is very limited.

Synergies

This section won't be as brief as the above; Qiubai's kit offers a lot of options in this area. Something I haven't fully discussed yet is that Qiubai in general has high compatibility with enablers, since both her talent 1 and all her skills have good modifiers.

Suzuran

Suzuran's s3 pairs perfectly with Qiubai s3, providing not only 100% Slow uptime but also 40% Fragile, for an overall 80% dps increase alongside even more cc. And their rotations line up perfectly; Suzu's s3 lasts 5s longer than Qiubai's, while her cooldown is 5s shorter accounting for her own SP battery. Given that Qiubai already has good damage on her own, however, this synergy tends to work in reverse from what most people think--Qiubai doesn't benefit from having Suzuran inasmuch as Suzuran benefits from Qiubai. Suzuran's duration, Slow, healing, range, and ease of use all give her utility over other enablers like Gnosis, Warfarin, and Aak--at the cost of a lower damage increase. But when paired with Qiubai who turns Slow into dps, Suzuran can have her cake and eat it too.

Ines

Ines' first talent will apply a 5s Bind the first time she hits any given enemy, allowing Qiubai 4 guaranteed talent 1 procs (assuming Qiubai isn't distracted by any other enemies, and that Qiubai's s3 isn't active) which substantially improves her damage output and circumvents RNG. Ines' range aligns perfectly if you put her directly in front of Qiubai, plus she negates Stealth and applies a move speed penalty to let Qiubai take even more advantage of her range. And taking advantage of this combo has little opportunity cost, as Ines will likely be on your squad by default if you own her due to how good she is.

Swire2

Swire2 s2 is an alternative Slower who's more focused on personal dps (which she has a lot of), but she has incredible uptime; factoring in her s2's ability to store charges and plant mines it's realistic for her to provide Qiubai with near 100% Slow uptime for both skills and basic attacks, making Qiubai's downtime performance much better. Swire2 s2's range is perfect for being placed directly in front of Qiubai, and thanks to her base stats and passive revive she also acts as the tank/healer of the combo.

Ethan/Earthspirit

These two are the budget alternatives if you want Bind/Slow. Ethan's duration matches Qiubai s3 exactly, but he has some RNG of his own (heavily weighted in your favor with his module) and he doesn't offer much Bind during downtime. Earthspirit (max module required) has 5s less duration than Qiubai s3, but in exchange her Slow will have 100% uptime during s2, and a very respectable ~80% uptime during her downtime that significantly improves Qiubai's basic attacks and mostly makes up for her slightly shorter skill duration.

Liskarm

Lord range is perfect for getting charged by Liskarm, letting Qiubai use her s2 more often (or s3 if you're so inclined). Liskarm also has her own RNG AoE Stun via s2, which won't trigger Qiubai's talent but still adds to the overall cc of the pair.

Skadi2

Qiubai in general has good scaling with buffs, so she can obviously benefit greatly from Skadi2 s2's passive Attack buff. A less obvious benefit is that since Qiubai already has above-average Defense Skadi2 can bring her up to ~DPS Defender level, making Qiubai surprisingly durable.

Ch'en1

With her X3 module, Ch'en1 is a premier SP battery for offensive (and defensive) recovery skills, improving Qiubai s1's Bind uptime, but most importantly letting her use s2 more often. Ch'en1's s2 is essentially a weaker Qiubai s2, but you can use the two of them together for more damage, alternate between them for more coverage, or use one of Ch'en1's other skills instead.

Stainless

Stainless can help Qiubai in different ways, depending on her skills. Stainless s2 is a strong but focused SP battery, perfect for improving Qiubai s1's Bind uptime. Stainless s3 provides a permanent target for her offensive recovery s2, and can help compensate for the lost range. And since Qiubai's s3 attacks 3 targets very quickly its one of the best options for making the most of Stainless s3's dps, though this is normally overkill.

Base Skills

At e0 Qiubai's base skill is Guard Expert α, a Training Room skill. Guard Expert α provides +30% training speed for Guards.

At e2 Guard Expert α upgrades to Combat Techniques: Lord. Combat Techniques: Lord provides +45% training speed for Guards, and an additional +30% for Lords.

The branch-specific kind of Training Room skill ultimately can't measure up to Irene and the m#-specific kind, so Qiubai's base skill is functionally irrelevant for the most part. Adding insult to injury, she can't train herself and she's just about the only Lord where you'd consider mastering multiple skills.

Closing

This guide is more to raise awareness than instruct, but I'll still try to answer any questions on the subject. The subject of my next guide is uncertain, due to the current schedule shuffling, but I can at least promise a Muelsyse guide when the time comes.

In case you'd like to see Qiubai in action for yourself, here are some videos (possible spoilers ahead). These are generally showing her performance in extreme scenarios and at max level, but they should give you an idea of what her upper limit is like. There are many fewer videos than normal this time as well, in this case due to me not having enough time to look for good ones.

  • various, Qiubai s3 solo vs many bosses
  • various, Qiubai s3+Suzuran s3 vs many bosses
[–] [email protected] 5 points 1 year ago

Eyjafjalla the Hvit Aska

  • Eyja2 is a Wandering Medic, letting her heal annoying elemental damage. She's also the first 6* gacha nondps Medic since launch.
  • Talent 1 is a simple improvement to her hps and elehps, and being a heal over time helps avoid overhealing. It's much stronger than it may seem, since it's per second rather than using ter 2.85s attack interval.
  • Talent2 on its own is fairly minor, but still helps her do her job.
  • S1 is surprisingly a top sustained hps skill and has ele healing to match, alongside the passive ele regen from this skill being able to affect normally unhealable operators.
  • S2 gives a huge chunk of elemental Barrier, but all affected operators use the same pool of Barrier; fantastic for keeping a single target from taking ele damage, terrible for keeping groups safe.
  • S3 is good but not gamechanging in terms of hps, though it is excellent when it comes to elehps. The main draw is the global range and bringing talent 2 to +30% max HP and a whopping 60% elemental damage reduction, effectivelly turning off ele damage for its duration.
  • Eyja2 is another operator who's very good at what she does, but what she does is of limited relevance. As annoying as elemental damage can be, you can normally just play around it, and the Berries are sufficient for most situations. And while s1 is still a great skille ven if only considering HP healing, so many operators these days heal themselves, and there are healers with more offensive benefit as well.

Modules

  • Centurions already have arguably the best chassis of any branch; CEN-X's 110% ascale is a straightforward and useful buff that's worthwhile on any of them you use.
  • Blaze's mod3 gives her 2064 dph and 1927 dps at e2 90 with s2m3, up from 1650 dph and 1375 dps. That's 25% more dph and 40% more dps, massive improvements by module standards. It's still just numeric improvments so it won't fundamentally change how you use her, but it's hard to pass up if you do use her.
  • Gavial2's module upgrades are comparatively weaker and diluted by her larger +% Attack from skills; on top of that s2 often won't even get the benefit of the trait upgrade.
  • Specter1's mod3 amounts to 24% more personal dps; while the AH buff is weak it's still worth considering for the improvement she gets alone, and if you are using other AHs regularly it just gets more valuable.
  • Broca and Savage both got mediocre upgrades.
  • Estelle is the only current recipient of CEN-Y, reinforcing her role as a tank, and both the module and upgrades are fairly good if you use her.
  • Reapers also have a great chassis, and REA-X is a substantial 20% increase to their self-healing (except Humus s1); as with CEN-X getting mod1 is very valuable.
  • Executor2's module nearly doubles the chances of him getting a bonus hit, and adds a lot of Defense ignore to those bonus hits. This amounts to ~30% more dps during his skill downtime (not doing the math for during uptime), and improves his SP gen by 20% on average. While it won't entirely fix the awkwardness of his rotations, I think it's effectively mandatory if you want to use him.
  • La Pluma's upgrades are just fairly minor extra damage, with the main reason you'd consider them being that Pluma herself is already very good.
  • Highmore, now that IS3 is over, is effectively La Pluma but worse; this module does lean into her one advantage, but it's not much.
  • Humus is another La Pluma downgrade with weaker module upgrades.
  • Overall, this batch is very good for mod1s, not so much for mod3s, with the exceptions of Exec2, Blaze, and Spec1.

As far as patches go, this one is rather boring. The welfare is terrible, the 5* is okay in a weird niche, and both the 6*s are relatively situational units that you could probably get away with borrowing when needed rather than pulling them. Modules are very cost-efficient with mod1 being the best level, and are a "the rich get richer" lineup.

[–] [email protected] 5 points 1 year ago* (last edited 1 year ago) (2 children)

First impressions:

Bryophyta

  • Bryophyta is an Instructor, a notoriously weak branch; not off to a good start.
  • His talent sets the tone for his kit: pure Defense buffing is of limited use, and he comes with a range restriction to boot.
  • His module tries to give him better numbers, and doesn't do much.
  • His s1 is a beta skill like 4*s have rather than the vastly superior gamma version that 5-6*s (except Savage) get, and is consequently not very good.
  • His s2 is another Defense buff with a poor rotation and unecessary Stun.
  • Someone at HG really hates this man.

Poncirus

  • Pioneers are a relatively basic branch, not much to say about them.
  • Poncirus's talent is a decent HP boost, and her max HP is already on the high side for her branch.
  • Poncirus's module further doubles down on her general role as a statstick.
  • S1 is a generic skill.
  • S2 is her primary draw; the Attack buff isn't enough for her to handle most non-trash mobs, but between her naturally high Defense,this skill, her module, and her trait she gets a considerable amount of bulk for a Vanguard. An average 0.25 DP/s once the skill is infinite is on the low end compared to other autoactivation DP skills (her own s1 gives ~0.32 DP/s).
  • Poncirus is rather good at what she does (afk tanking+DP gen while disposing of trash mobs); her main problem is that what she does is of limited relevance. Still, it's neat to have the option.

Swire the Elegant Wit

  • Merchants have surprisingly high stats, on par with Guards, while also being frds. The DP drain can be costly, but module will help with that.
  • Talent 1 is mostly a nontalent like Summoners get, free Attack is a useful bonus at least.
  • Talent2 can potentially be very useful for stalling, and in general provides a safety net when using her.
  • Module 1 is effectively mandatory to reduce the DP gen; mod2 is a small damage boost, and mod3 is only for s3.
  • S1 effectively has a 3s cooldown and can hold 3 charges. Having an frd ground Medic like this is potentially very useful utility, and alongside talent 2 Swire2 herself becomes very hard to kill.
  • ~~S2 effectively has a 3s cooldown and can hold 5 charges. It's a weird skill, turning her into a grounded Trapmaster; the damage numbers on it look reasonable, hitting just over 5k total damage/bottle if maxed out. The main downside is that the limited range makes it hard to hit any given enemy with more than 2, which will probably make this skill unsuitable for regular use.~~ The livestream had said that bottles couldn't be placed on enemy-occupied tiles, but it turns out that was a mistake. Being able to drop the bottles on enemies makes this skill considerably better, allowing it to function as a sustained dps skill, and letting her capitalize on the Slow by spamming bottles onto affected enemies. Also, something I forgot to mention is that this skill and s1 both have no SP lockout, meaning that they're equivalent to a skill that has a 2s cooldown with SP lockout.
  • S3's double hit is good for dps on its own, especially with talent 1; a maxed Swire2 can put out ~2.5k dps. But the main draw is the yeet nuke; due to how push works it won't be much, if any, use on bosses, but ti can send most enemeis to the other side of the map.
  • Swire2 continues the Merchant tradition of having a grab bag of weird abilities, and will likely have variety of uses in more tactical clears, though those more inclined to brute force thigns probably won't bother with her.

kbin character limit too low


Reed the Flame Shadow is the first nonlimited 6* alter, of the 5* Vanguard Reed. While Reed1 has long been a fan favorite thanks to her personality, lore, and swishy tail (among many other reasons), she has gotten the short end of the stick in terms of gameplay. Thankfully her alter finally does her justice, boasting outstanding healing, single-target Arts dps, and AoE Arts dps, alongside both offensive and defensive debuffs. Reed2 is an operator with both a high floor and high high ceiling; her raw numbers make it easy to get good performance from her, but her kit rewards skillful use even more, which this guide will hopefully help with.

Basic Information

Reed2 is a 6* Incantation Medic, meaning she's functionally a Caster who heals allies by attacking enemies. And despite being a hybrid she's no master-of-none, boasting both the highest hps and Arts dps in the game. And she doesn't have any major drawbacks to compensate either; the closest thing she has to a "flaw" is that she has to choose between single-target with s2 and AoE with s3, rather than having a skill that does massive single-target damage in an AoE like Surtr/Mlynar/etc.

Offensive Stats

Reed2 has below-average Attack, a 1.6 second attack interval, low dps, slightly below-average hps, and a 3x4 range. While her base stats aren't impressive, her talents and skills are where most of her power comes from, and her range is good.

Defensive Stats

Reed2 has below-average HP, low Defense, and 20 Res. She can self-heal and isn't meant to be tanking in the first place so she doesn't need high defensive stats anyway.

Cost and Trust

Reed2 has a low 17 DP cost, undercutting nearly all Casters and Medics. This is 1 lower than it "should" be since it's identical to the 5* Incantation Medic Hibiscus the Purifer, but both Surtr and Orchid have had similar discounts for far longer so it's unlikely to be patched. Reed2's trust is a mixed +50 Attack +30 Defense, the latter of which is sadly wasted.

Trait: Attacks deal Arts damage. When attacking enemies, recover HP to an ally within Attack Range for 50% of the damage dealt

Something important to note here is that Reed's healing is based on damage (as opposed to Nightmare s2 which is only based on Nightmare's own Attack). This means that if Reed2's attacking an enemy with Res, her healing output will also be reduced. But on the other hand, effects that increase damage taken by enemies will also increase her healing proportionately. Another thing to keep in mind is that Reed2 only heals when she has enemies to attack, so you have to position her more aggressively than most Medics, she can't top off allies during downtime, and she's at a disadvantage vs the likes of poison haze and mortars that outrange her. Also, be aware that certain effects that reduce damage to 0 will prevent Reed2's healing from triggering; this includes the likes of Shields and Barriers (if the latter is enough to absorb all damage from the attack), but not dodge. Reed2's healing also ignores the "only take 1 damage/attack" property of IW enemies and her own event's Embers, healing based on how much damage she would have done if they were regular enemies.

First talent: Cinder

When dealing damage, has 30% chance to inflict Cinder (-20% Attack, 30% Arts Fragility) to the enemy, does not stack and lasts for 6 seconds

One of the centerpieces of Reed2's kit, Cinder is a phenomonal debuff. The Arts Fragility, as hinted above, increases not only her dps but also her hps by 30%, which goes a long way towards compensating for her low base dps/hps. And since it's a debuff it also amps the damage dealt by other operators; it doesn't stack with other sources of Arts Fragility, but at the time of writing Hibiscus2 and Qanipalaat are the only other operators with said debuff. Suzuran/Gnosis apply regular Fragile, and Saria s3 applies a unique debuff, so Reed2's debuff will stack with theirs. The Attack debuff is very powerful as well; it reduces Arts/True damage dealt by enemies by 20%, but due to the physical damage formula being subtractive it reduces physical damage by more than 20%. Both of these combined make Reed2 very effective at keeping operators alive. On its own the 30% chance isn't enough to reliably maintain 100% uptime of Cinder on a single target, but all of her skills will improve her ability to apply it. As with most debuffs in AK it is applied before damage is calculated, so attacks that apply it will benefit from the 30% Arts Fragility. If Reed2 leaves the field all Cinders are removed.

Second talent: Incandescence

When healing other allies, Reed2 receives 50% of the amount healed.

This talent is not nearly as important as her first, but it's still handy. It lets Reed2 focus her heals on other units instead of possibly having to heal herself if she takes stray hits.

First skill: Swift Strike γ

At m3{m0}, Swift Strike γ has 15{10} initial SP, costs 35{39} SP, recovers SP over time, lasts 35 seconds, and is manually activated. It gives Reed2 +45%{+34%} Attack and +45{+35} ASPD.

While Swift Strike is a generic skill, it's one of the best alongside Power Strike, and the faster ASPD gives her more chances to apply Cinder. S1 still pales in comparison to her other skills, however, and loses to s3 in every respect aside from slightly higher uptime (50% vs ~43%).

Second skill: Wither and Thrive

At m3{m0}, Wither and Thrive has 18{15} initial SP, costs 27{33} SP, recovers SP over time, lasts 20 seconds, and is manually activated. It summons rings of 3 fireballs around up to 2 operators, prioritizing the most recently deployed allies on ground tiles, followed by the most recently deployed allies on high tiles. The fireballs rotate around the recipients at a 0.5 tile radius (completing a full revolution every 2.4s) and have a hitbox with a 0.6 tile radius, dealing Arts damage equal to 240%{190%} of Reed's Attack when they collide with a grounded enemy, with each fireball having an internal 1.5s cooldown on how often it can deal damage. The healing the fireballs produce via Reed2's trait will always target the operator the fireballs are orbiting; operators like Penance with healing immunity are still valid fireball recipients but the healing will be wasted, while summons like Phantom's clone are not valid recipients at all. Fireballs will despawn if Reed2 or the recipient leaves the field.

The fireballs have a lot of details to their mechanics, but the tl;dr is that in a "normal" scenario (you deploy a melee unit, then enemies walk up to them and are blocked) s2 will hit every ~0.8s on average, gated by how fast they rotate rather than their internal cooldown. In unusual scenarios (enemies approaching from multiple directions, helidropping the blocker directly on to an enemy so the enemy is closer to the center of the tile) s2 will hit every 0.5s at best. Note that Reed2 does not stop attacking during s2, and the fireballs can apply Cinder; with their hitrate it's safe to assume 100% Cinder uptime on anything that isn't dying immediately.

Reed2 s2 has the highest single-target Arts dps in the game, and nothing else even comes close; for perspective even if s2 is only hitting every 0.8s with one set of fireballs (and Reed2's basic attacks), an e2 90 Reed2 will deal ~2.8k dps, more than Surtr s3 or a no-module Texas2 s2. If you get both sets of fireballs hitting the same enemy and/or get them to hit off cooldown, then the dps skyrockets, up to ~7.8k in ideal circumstances--and while getting a perfect setup is hard, "drop a second melee unit on top of the target who is already blocked" is still ~80% of that maximum strength for minimal effort. Or, given that stacking fireballs is already overkill most of the time, you can simply take advantage of Reed2 being able to put the sets of fireballs into two separate lanes. There's not much need to worry about the safety of blockers either, as 50% of the fireballs' enormous dps is already enough to heal through almost anything even before accounting for Cinder's Attack debuff. And while s2 is intended to be a single-target skill, it's worth mentioning that thanks to its overwhelming dps it can still burn through groups of enemies quickly.

But what really makes this skill ridiculous is that despite having both the highest hps and the game and highest single-target Arts dps, the rotation is excellent. 20s duration and 27s cooldown is fast enough that s2 can be used almost every wave. While the short duration does make the total dps suffer in theory, in practice s2's sheer dps is enough to compensate, and if you helidrop in a second blocker as described above then the total damage becomes a six digit number. But even if that's not enough, Reed2 s2 is a pure attack/damage scale skill instead of using +Attack, making it extremely receptive to buffs, comparable to Exusiai s3 if both sets of fireballs are hitting (Reed s2 has slightly higher ascale/sec, but Exusiai being physical means she gets a greater relative improvement).

The one drawback s2 has is its range, or lack thereof; the maximum range of the fireballs is a 1.1 tile radius circle centered on the recipient, limiting s2's effectiveness against scattered groups of enemies. A related aspect is that s2 targets operators, so undeployable tiles will limit its potential range. Neither of these are dealbreakers given that it's inteded as a single-target skill in the first place, but it is a complication that other ranged operators mostly lack.

Third skill: Ember of Life

At m3{m0}, Ember of Life has 30{20} initial SP, costs 40 SP, recovers SP over time, lasts 30 seconds, and is manually activated. It gives Reed2 +60%{+40%} Attack, allows her to attack 2 targets, and gives talent 1 a 100% chance to apply an enhanced Cinder. These enhanced Cinders last until the skill ends and deal Arts damage per second equal to 60%{30%} of Reed2's Attack in addition to their normal effects. When an enemy dies while inflicted with this enhanced Cinder, all enemies within a 1.7 tile radius have enhanced Cinder applied immediately and after a 0.1s delay take Arts damage equal to 140%{110%} of Reed2's Attack.

S3 will utterly annihilate trash mobs (and anything else unfortunate enough to be caught inside a group of them) due to the chain reaction of on-death explosions, to the point that it can cause the game to lag on maps with large enough hordes. The 1.7 tile radius is one of the widest splash AoEs in the game (equal to Dusk s1), and both the explosions and the DoT also trigger Reed2's trait so it produces impressive bursts of healing as well. By modern AK's standards s3's rotation is on the long side of things, though not unduly so. There's not much else to say about s3's performance vs hordes.

Rather, the main point of discussion is how well s3 does when it's not able to turn maps into a sea of flames, such as against a smaller number of elite enemies, the survivors of a chain reaction, or a boss. In these situations s3 still has solid dps and excellent; compared to similar dps+debuff skills like Ifrit s3 and Gnosis s3, Reed2 s3 has a weaker offensive debuff but higher personal dps, a defensive debuff, and healing. While in a pure single-target scenario s2 will be better as long as range isn't an issue (s1 will always be worse), s3 is far from reliant on hordes of trash mobs to be useful.

Mastery Choices

Reed2 has some of the easiest mastery choices in the game: both s2 and s3 are very strong and have high mastery gains, so m6 is the way to go. If you must choose, I favor s2; I consider it overall easier to use, it has a better rotation, and the massive focused dps and hps is generally harder to come by than clearing out large groups of mobs.

Usage

Reed2's a surprisingly simple operator to use for as complex as her skills can be, with the main thing you need to pay attention to being her positioning.

General Tips

  • Reed2 should normally be treated as a Caster first and a Medic second. Viewed as a Caster, Reed has a range advantage against most of them and her offense is more than enough to compete with even the best Casters, while having additional utility in the form of Cinder and healing. Viewed as a Medic, she does still have higher burst hps and an Attack debuff, but her offskill hps is erratic thanks to Cinder not having 100% uptime and enemy Res reducing her healing, and reliance on hitting enemies can be a dealbreaker if there's enough enemies that outrange her and/or environmental damage. Furthermore, Reed2's effectively at a range disadvantage vs normal Medics, as she has to balance her positioning between covering more enemies to enable her healing and covering more allies to recieve her healing, which gets even worse if you try to have her cover multiple lanes.
  • Therefore, if you are focusing on her healing, you shouldn't expect her to cover all your team's healing needs the way a dedicated healer can. The fewer operators she's expected to heal, the more freedom you have when positioning her, and the more reliable her healing will be. Also, keep in mind that in terms of healing her main advantage is her burst hps--s2 has the highest hps in the game so it's fantastic for sustaining through bosses, and as long as there are multiple targets s3 has top-tier hps so it can easily sustain through heavy waves of elites.
  • Both s2 and s3 have high enough initial SP that you can helidrop them, giving you access to their massive hps (and dps) very quickly. While this generally isn't fast enough to be used reactively to save a dying operator, proactive use of this can let you helidrop other operators into dangerous situations alongisde her, counting on Reed2 to keep them alive past those first few seconds.
  • While s2's fireballs prioritize operators on melee tiles and their range is a lot more convenient when you have blockers to keep enemies in place, fireballs ending up on a ranged operator (such as Reed herself) isn't necessarily a complete waste. They'll still hit enemies passing by said operator, which is often enough to clean up squisier enemies.
  • Reed2 may have low defensive stats, but her healing still gives her much better survivability than the vast majority of ranged dps. You can exploit this to position her more aggressively and help make sure she has enemies to attack more of the time, possibly even placing her solo. That normally restricts you to using s3, however, as s2 likely won't have any useful recipients if you do this.

S2 Overlaps

While s2 hardly needs the sets of fireballs to overlap to be great, it's also not that hard to overlap them, and doing so nets you a couple thousand extra dps.

  • The largest overlap area is when the recipients are orthogonally adjacent, but this more-or-less requires that the enemy be on the tile of one of the recipients. This normally requires a little more setup, such as helidropping in a second unit after the first blocks the enemy, using a block 0 units, or intentionally allowing enemies to leak past the frontmost unit, but also typically makes it so at least one of the sets of fireballs will be hitting off cooldown, giving even more dps.
  • The easiest method is when the recipients are diagonally adjacent, not requiring as much setup--you can even achieve this easily by having Reed2 as one of the recipients, with the other being a melee unit to handle the blocking. This method does have a smaller overlap so enemies that go to one side of a tile rather than moving down the center might escape one of the sets of fireballs, and generally you can't get the extra hitrate with this setup so the dps won't be as high as the first, but it's a fairly small loss.
  • Included for completeness, when there's 1 tile of space between the recipients there's still a sliver of overlap, but it's near impossible to use unless the enemy is obediently idling in the center of the tile.

Synergies

Reed2 inherently works well with just about anyone, so this section is for those that have something special to their interaction with her.

Surtr

S3 Surtr has extremely high Arts dps and ignores some Res, but also ramping HP drain. S2 Reed2 has extremely high Arts dps, inflicts a debuff that increases Arts damage recieved and decreases Attack, and has the highest hps in the game. So not only are these two both very strong on their own, but as if that wasn't enough Reed2 also provides a massive boost to Surtr's performance. And both of these skills are even helidrop-friendly, so you don't even have to change up Surtr's use case to take advantage of this.

Enablers

I mentioned above that Reed2's s2 has no +Attack but lots of ascale/s, making her highly compatible with Attack buffers. On top of that s2's short duration and high dps line up well with the typically short durations of enablers in general.

Skadi2

Due to Reed2's low base Attack, flat Attack buffs are at an advantage vs % Attack buffs for her, Skadi2's regen covers for Reed2's possible healing downtime, and her Defense buff compounds Reed2's attack debuff. In return Reed2 can keep Skadi2 alive during the latter's s3, and since Skadi2's buffs are AoE, other units can benefit from them alongside Reed2's Arts Fragility.

Fast/Medium Redeploys

Reed2 s2 has a fast rotation, but limited range. F/mrds (such as Executors, Merchants, Agents, and a few others like X3 Skadi1) offer the ability to place fireball recipients where you want them, when you want them, moving their location around between casts of s2. They also make it trivially easy to get orthogonal overlaps for maximum dps. All of them are usable for this, but a few have extra advantages:

Texas2

Texas2 s2 has extremely high Arts and debuffs Res, but she's squishy. Much like Surtr she pairs well with s2 Reed2; she doesn't get quite as much on her own since her HP isn't automatically draining, but she gives more back since she debuffs Res, and she's also a helidrop. You can even go for a triple whammy by dropping Reed2/Surtr/Texas2 together on some poor victim, but good luck finding things with enough bulk to justify this.

Yato2

Yato2 normally runs s3 or s2; in both cases she's a poor choice with Reed2 s2 as those skills unload all their damage in only a few seconds, meaning she'd just be standing around doing basic attacks for most of Reed s2's duration. However, Yato2 s1 has the same duration as Reed2 s2, with one of its main drawbacks being that Yato2 on her own is too squishy to reliably pull off the entire skill, which Reed2 easily resolves. Furthermore, Yato2 s1 also has extremely good scaling with Attack buffers, though much like Reed2/Surtr/Texas2 this is going to be overkill.

Block 0s

Do you want to have the benefits of fireball overlaps but deploying an f/mrd once the enemy is blocked is too much work? Ask yourself, Dokutah, if Block 0s might be right for you! Simply deploy an Ambusher or Liberator in front of your blocker and unsuspecting enemies will walk into the overlap zone by themselves, so all you have to do is activate s2.

Gatherers

Reed2's s3 can benefit from having a lot of mobs stacked up in one spot, turning them into a nuke to wipe out some tougher target along with them. The main candidates for this are s2 Weedy, s3 Gladiia, and s3 Lee. While this is normally impractical, it may be helpful if fighting a boss that summons minions.

Base Skills

At e0 Reed2's base skill is Red Dragon's Blood, a Training Room skill. Red Dragon's Blood provides +30% skill training speed for Casters and Medics.

At e1 Reed2 gains a second base skill, Leader, a Control Center skill. Leader restores 0.05 morale per hour to all Operators in all Dorms. (Only the strongest stacked effect of this type takes place)

At e2 Red Dragon's Blood upgrades, providing +45% skill training speed for Casters and Medics.

Reed2's base skills are inferior to even generic skills.

Closing

There's a lot more I could say about Reed2, but it's ultimately minor stuff that you'll pick up as you use her, though if you have any specific questions don't hesitate to ask. Since I've moved to kbin now, I might work on migrating and updating my older operator guides here as well. The next new guide I intend to make is for Qiubai.

In case you'd like to see Reed2 in action for yourself, here are some videos (possible spoilers ahead). These are generally showing her performance in extreme scenarios and at max level, but they should give you an idea of what her upper limit is like. There are a lot less videos than normal this time, for a few different reasons. One of them is that bilibili searches for Reed2 are oversaturated with videos of giant s3 explosion chains on maps like H7-1 or 11-6, making it hard to find the good stuff. Another is that, while Reed2 is an integral part of Medicknights, Medicknights can't really use her to full effect the way someone like Blemishine could be used in a Defenderknights clear--Medicknights has no good recipients for s2's fireballs since Mon3tr is a summon, and if there's one thing Medicknights doesn't lack it's healing. And finally, low op clears tend not to use s2 because it normally needs multiple units (Reed2 and a fireball recipient) to work properly. All of these together make it hard to find videos that showcase s2 especially, but to a lesser extent s3 as well.